Friday, January 25, 2013

Best Ever Mexican Salad

Hello and Howdy Everyone!

Today I'm (Annette) sharing a true family favorite recipe! You will find this at any of our family gatherings, dinner parties, church or office luncheons, and about any other special occasion you want to make a hit.  I personally have never taken this recipe to any place it wasn't the "favorite" dish and the first to go. BEST EVER MEXICAN SALAD"!  Just makes you want some, right? ;)

I made my family my famous sloppy joe's last night (can sloppy joe's really be famous?) and my little girl specifically asked for Mexican Salad.  Bailey is typically a big meat eater, but, LOVES salads of any kind.  I thought to myself...sloppy joes with Mexican salad? Hum...well why not? It is vegetables.  Right folks?  We want our kids to eat vegetables! So here goes!

Best Ever Mexican Salad

Ingredients

1 large head of lettuce chopped bite size
3 tomatoes chopped
1 medium sweet onion chopped in small pieces
1 1/2 cups longhorn cheddar cheese grated
1 15 oz can Ranch Style Beans drained
1 16 oz bottle Catalina Dressing
1 10 1/2 oz bag Fritos (the original kind) crush up into small pieces


In a large bowl put your chopped lettuce in then add the tomatoes and onions. Spread your cheese generously on top of the salad mixture. Add the ranch style beans and Fritos.


Pour your salad dressing over your salad and fold gently as you don't want to mash up your beans. If you are taking this recipe to a function be sure to bag each ingredient separately and mix together right before you eat it. This will keep your salad from wilting and the chips crunchy. This is definitely a simple recipe, but, I personally have never had anyone else make it for me or bring it to a get together except my family. I promise you will get many compliments on this dish.  It's not just a salad...it can be a meal! :)


Voila!


Well I hope you all enjoy our Mexican Salad as much as we do!  The pictures don't do the salad justice.  I guess I'll have to invest in a better camera like my sissy, Beth.  However, let's face it...Beth is the picture taking queen!  That's a story for another day. ;)
We hope you all have a wonderful week-end with your families and friends! It's such a blessing to have the opportunity to share our food and times with all of you!

Always in Our PJs,
Annette & Beth

Tuesday, January 22, 2013

Amazing Stuffed Summer Squash

Hello and Howdy Everyone!

Today I want to share with you a dish that will truly make you look like a master chef among family and friends!  It's a little time consuming, but definitely will be worth the love you put into it. Let's face it...love is always the secret ingredient in every recipe. Coming from West Texas with a daddy who loved to grow fresh vegetables gave Beth and me (Annette) a true appreciation for those hard earned veggies!  Out Daddy spend many hours in the summer not only growing that garden, but, getting Beth and I "involved" in the whole process.  Not such a tremendous memory then, ;) but, an awesome memory now! Let's face it folks hoeing and picking the garden was not our idea of a fun summer. :)

Squash is a very versatile veggie. I had a little inspiration from my childhood memories on this recipe, but, had to make it my own.  Hope you love this recipe as much as my family does.  It's my husband's new favorite dish.  Well her goes...

 Amazing Stuffed Summer Squash

Ingredients

4 Zucchini Squash (You can use any "summer" squash you like, but was all I found at my supermarket that was of high quality)
1 medium sweet onion diced small
1 large red bell pepper diced small
1/2 lb ground beef
1/2 lb ground pork
4 large pods of garlic, thinly sliced
1 can cream of mushroom soup
1/3 cup carnation milk
1 Tbsp Lawry's seasoning salt
1 Tbsp Lawry's garlic salt
1 teaspoon ground cayenne pepper (optional)
Salt/pepper
Gouda Cheese


First you want to fill a large pot with water and bring it to a boil.  Place your zucchini in the boiling water and turn the heat down a little to a medium boil.  Then put a lid on it.  Cook for about 10-15 minute (depending on the size of your squash) or until fork tender.  Take your squash out and set aside to cool while you get your other ingredients prepared.

In a separate skillet combine your ground pork and beef together and season to taste.  I add salt, small amount of cayenne, pepper and onion powder to season the meat.  When your meat mixture is browned, drain and set aside.

In another skillet add a small amount of olive oil.  Put your red bell pepper, onions and garlic in and saute until slightly soft. Remove from the heat and set aside.


Now for the "fun" ;) part.  Slice your zucchini long ways and carefully remove the insides.  A little tedious, but, you'll be proud of your effort at the dinner table. Be sure and reserve the inside of your squash as it will be part of your stuffing (You will need to mash up the squash you reserved).  Take a large bowl and combine your mashed up squash, meat mixture, vegetables, carnation milk, mushroom soup, cayenne, garlic salt and Lawry's. Season the salt and pepper to taste. Stir the mixture well then gently scoop mixture into the hulled out zucchini.

Bake uncovered at 350 for about 15 minutes. Take your squash out and cover with Gouda cheese. I use Gouda because it melts very well and has a mild flavor.  It also happens to be my favorite cheese. ;)  Of course you can use any cheese you like.  Place your zucchini back into the oven and cook until your cheese is melted and a little bubbly.

Voila!


Sounds like too much trouble for squash, but will be a family favorite.  My husband, Pete, likes almost everything, but, my little girl, Bailey is definitely a lot more difficult to please - especially when it comes to vegetables!! This will also look really fancy when you have company over for dinner.  You know you want to impress! lol

I can't tell you how much fun this has been sharing recipes, tips, products we love, and whatever comes to mind!  I will say spending this time with my sissy, Beth, has been beyond awesome! Cooking with her and talking up food is truly my fave! She's a pretty special lady, but, don't tell her I said that! Ssssh!

We hope you have an extra great week this week and please feel free to let us know how you feel about what we are sharing with you. 

Always in Our PJs,
Annette & Beth


Monday, January 21, 2013

The Perfect Hard-Boiled Egg

Good Day All!

One of those things you have to know how to do as a cook is boil an egg - Duh!  How else would we get Deviled Eggs???  (Maybe I will be able to get my darling daughter to do a guest blog on how she makes hers.  She will if she loves me - no pressure, Kelsi.)

Anyway, I have found that even these seemingly simple tasks can seem difficult if you have never done them.  There are a few tips to share on this subject.

1)  Apparently it is easier to peel OLD eggs... yep, buy your eggs a few days in advance.
     That's what I'm told.  Don't shoot the messenger.

2)  Place your eggs in a pan and cover with a few inches of COLD water.  It is important the water be COLD, because bringing your eggs to boil slowly will prevent cracking.  Some people suggest you add salt as well to make the eggs easier to peel, but I haven't ever done this.  I think I'll try it out. I never stop learning or trying new things in the kitchen.


3)  Turn the heat on high and bring your eggs to a rolling boil.


4)  Immediately turn off the heat and cover with a lid.
5)  Let the eggs stand for 20 minutes in the water.
6)  Pour out the hot water and cool the eggs in ice water.


7)  Enjoy right away, use them in your recipe, or store unpeeled for up to one week in the refrigerator.
     *Do not peel an egg until you are ready to eat/use it.


We keep these on-hand to throw in lunches or have for a snack.  They are a wonderful source of protein. 

If you are lucky enough to have a place to get fresh eggs, there is a huge flavor difference, so I would check that resource out. 

Simple, easy, and cheap - gotta love eggs!

Always in Our PJs,
Annette & Beth

Thursday, January 17, 2013

Breakfast Smoothies - Start the Day Right!

Hello blog world!

Annette INSISTS that after I blogged about my "Smoothie Packets," I need to blog about how I actually use them.  You can see our original post here:  Make Ahead Tips for Healthy Eating .


Well, here is the base for most of my smoothies:


My awesome new Ninja blender (makes me happy and makes smoothie making fun and easy), Almond Milk, Non-fat plain greek yogurt, some water, and a smoothie packet.  I also add spinach.  I promise you - no one in my house can taste it!!

Smoothies are a personal taste kind of thing, so there is no magic about a "recipe" involved.  You throw in what you have and go.  For instance, if I run out of Almond milk, I use the skim milk I keep on hand.  No biggie.  You have to do some experimenting to get the taste(s) you and your family members like.  I will say, a little banana goes a long way - consider yourself warned.

That being said, this is how my smoothies are being made these days:

Healthy Breakfast Smoothies 

1 cup of Almond Milk
2 very heaping Tablespoons of plain, non-fat Greek yogurt
   (feel free to use more - lots of protein) 
1 frozen smoothie packet
1 cup (ish) of spinach
1/4 - 1/2 cup cold water 
SPLASH of Vanilla is optional (secret ingredient - lol)
Ice cubes can be added if desired (Sometimes I do, sometimes I don't.)

Start with the liquid and yogurt, then throw in the frozen fruit - don't really "throw" it - that would make a mess and could possibly be dangerous. 


Put your spinach in last.


Put the top on your blender.  WARNING: DO NOT FORGET THIS STEP! (Unless you are looking for something that looks like an episode of "I Love Lucy.")  My blender won't even work without the lid - lol - pretty sure they were afraid someone would try that "no lid" thing.
You may want to use the "pulse" button a little at first to break up the frozen fruit and ice cubes if you elected to add them.

Turn that puppy (blender) on and let it do its thing.  Feel free to pack your lunch at this time.


Now listen, TAKE IT TO THE SINK.  I know you're awesome and all, but don't chance making a mess.  Go find an enormous cup, (this makes a huge serving) and fill 'er up.

Voila!

LOOK - IT'S MAROON!!!  WHOOP!!  (For those who aren't Aggies, just try to roll with it :)
Now all you need to do is get a straw and ENJOY!  I pop the top on it and take it right out the door to work with me.  I feel so great starting my day with calcium, iron, vitamins - basically a big, yummy glass of "healthy."

Here's an important tip - PLEASE go ahead and take the 30 seconds and rinse out your blender!  You will not be sorry!  This has yummy, sweet, sticky fruit in it and it will be MUCH more difficult to clean up later if you leave it.


Like I mentioned in the first part of this post, you need to make adjustments and go with what you have on head.  This morning I was out of spinach, so I decided to make a more "tropical" smoothie.
I substituted 1/2 cup of orange juice for the water and put in 2 pineapple spears.


WOWZERS! PURPLICIOUS :)


I hope this has helped those of you who are looking for a healthy start to your day and didn't know how to use the Smoothie Packets.  Remember, there is no "right" way and about a million recipes out there.  Experiment and have fun with it.  I promise I have just given you a way to easily sneak fruits and veggies (yeah, even spinach) into your children's' lives!  And I also promise I won't tell! SSSHHH =)

Always in Our PJs,
Annette & Beth

Tuesday, January 15, 2013

Our Favorite Green Enchiladas

Hello and Howdy Everyone!

Well I woke up to a very cold day with some "nice" sleet mixed in.  Love the cold and cloudy days, but not so excited about the sleet part.  Most Texans are not typically known for they're incredible driving abilities on days like today! ;)  At least not so much in a large city like I live in.  In all fairness though, we are not really used to a lot of snow, ice, and sleet in our part of the country. I could get into my inner feelings about that subject, but don't want you to see that side of me yet.  You know...the road rage part of my "sweet" personality. lol   Uh oh..caught myself doing a little rambling again! :)

Today I thought would be a perfect day to cook one of my family's favorite dishes.  This recipe I'm sharing is actually a recipe that's been in my family for years.  The last time Beth came to visit I made her some and let's just say it made her happy.  She's definitely an easy person to please, and I really like to make her happy! Coming from West Texas we love Mexican food! The recipes I prepare are typically known as Tex-Mex.  A mix between authentic Mexican with a little Texas flair. Duh, I know, right?  Anyway I hope you enjoy this family favorite as much as we do! So here goes!

Our Favorite Green Enchiladas

Ingredients

2 lbs of ground beef browned and drained
1 lg (2 lb) box of Velveeta cheese cut up into medium size pieces
1 12 oz can Carnation milk
1 10 3/4oz can Cream of Chicken soup
1 7oz jar of chopped pimentos
1 7oz can of chopped green chillies
1 lg sweet onion chopped
1 pkg of longhorn cheese shredded
24 corn tortillas
Vegetable Cooking Oil


You will need to start off  preparing the sauce as it's a little time consuming, and you can be getting your other elements prepared in the mean time.  In a double boiler combine your Velveeta cheese, Carnation milk, Cream of Chicken soup, pimentos, and green chillies. If you don't have a double boiler you can make one by putting water into a large pot and placing a large bowl on top of it.  Bring  the water to a slight boil.  This will melt your sauce evenly without scorching the cheese.  Be sure to stir your cheese mixture off and on to get the mixture incorporated together smoothly.

Let's start rolling up our enchiladas!  First though you will need to prepare your tortillas so they will roll properly and not break.  Put about 1 inch of cooking oil in a medium skillet and get it very hot. Using cooking tongs dip your tortillas into the oil quickly.  In and out.  Place on a plate that has paper towels on it.  That will absorb any extra oil.

You will place your enchiladas in a 9x13 casserole dish.  Take a small amount of the prepared cheese sauce and cover the bottom of your dish before you place your enchiladas on it.  Take 1 tortilla and fill with a small amount of the ground beef, onion and grated longhorn cheese. Gently roll it up and place in your casserole dish seam side down. Continue this process until your dish is full.


Pour your sauce over the top of the prepared enchiladas. Make sure you cover the dish completely with the sauce or they will be dry.


Put your dish into a preheated 350 degree oven for about 30-40 minutes or until bubbly.


Note:  I typically double this recipe and make 2 pans, as this recipe freezes very well.  I also will surprise a friend with a pan of these wonderful enchiladas occasionally!  Do I know how to make friends or what? ;)

Voila!


I feel you will be seeing many more Mexican inspired recipes from Beth and me in the future, as we both love to cook and eat this type of food a lot. We have so many memories from the time we were small to present in regards to our love for Mexican food.  We look forward to sharing some of our stories with all of you in the future. We hope you will take time tonight to sit down at your table with your loved ones and enjoy food and conversation together.  We all live in such a rush each day sometimes not taking the time to enjoy one another. Please "make" time for your family this evening. As always, it's been fun and a pleasure to share with you!  Have a wonderful day and week!!

Always in Our PJs,
Annette & Beth

Thursday, January 10, 2013

Sister Schubert's Rolls ~ Yummy Product Alert

HOWDY!
(Thought an Aggie greeting was appropriate, since Texas A&M AGGIES were the only team to beat the National Champions this season!  WHOOP!!!)

Annette and I were lucky to have had fresh, homemade bread for dinner most nights growing up.  They were also a part of every holiday meal.  Our Grandma Britton, who lived with us for quite some time, could really make rolls!  She and our mom could make awesome homemade biscuits and of course, cornbread.  I  did not appreciate that as a child, but I certainly do now!

Shout out to Grandma for being an AWESOME bread baker!!

Unfortunately, since I took it for granted, I never took the time to really learn to do it for myself.  I do remember that it was time consuming.  I remember seeing her let the dough rise in that old silver bowl.  I think there was punching involved - lol - that always looked fun.  I remember seeing her flouring the counter, and I know there's flour and yeast and stuff.  I also know there are plenty of recipes and "how to's" our there, but WHO HAS THE TIME??

I'm sure you all know there are some great frozen bread products out there.  When my dear sister, Annette, introduced me to Sister Schubert's Parker House Style Yeast Rolls, I was hooked!  I haven't used any other rolls since.

They are super yummy and couldn't be easier.  They are also small, so you feel you can eat more of them - Who's with me??  HaHa!  My son eats as many as he can get away with, so I normally have to make lots and remind him to make sure everyone gets some. :)

You find them in the freezer section and they look like this:


There are even directions for "IF YOU HAVE TIME TO THAW," and IF YOU ARE PREPARING FROM FROZEN."   Let's face it, we've all looked up and said, "Oh no, I forgot to thaw the rolls..."  If you haven't, please just let me believe we are all imperfect in the kitchen.

So, I know many if not all of you are thinking, I KNOW about Sister Schubert's rolls - DUH!  

Well have you tried her other products?  Like....
THESE??:


 Sausage Wrap Rolls AKA Pigs in a Blanket!  Same amount of easy for a quick breakfast treat! 

Or what about, WAIT for it....

THESE??:

Cinnamon Yeast Rolls!!!  I only discovered these in December and you bet I grabbed them.  It was Pigs in a Blanket and Cinnamon Rolls with our coffee on Christmas morning!  Everyone was happy - especially Annette and I, because we didn't have to slave over anything and we had yummy treats!


Each of these products take 15-20 minutes in a 350 oven if preparing when thawed.  I hope if you have not tried these products and can find them in your area, you will check them out.

Annette and I enjoy sharing the products we love in order to make your cooking and EATING experience more relaxed and enjoyable!

Always in Our PJs,
Beth & Annette

Tuesday, January 8, 2013

Tropical Fruit Salad

Hello Everyone!

For many of us today starts the first day after the holidays.  Beth and I (Annette) wanted to start this week off with some quick, easy and healthy tips and recipes.  She and I have made some New Year's Resolutions!  (Yikes!) We are going to do a few life style changes.  More exercise and better food choices are part of that change.  Don't get me wrong...we will continue to share a variety of recipes and tips as we have a passion for variety.  Just sayin'! ;) We have many Texas recipes to share with you.

This particular recipe is a family favorite especially with my husband, Pete.  Fruit Salad is the dish he requests the most during the holidays and as that special fruit dish to compliment any meal. I have tried many variations of fruit salad, but, this is my favorite. So here goes!

Ingredients

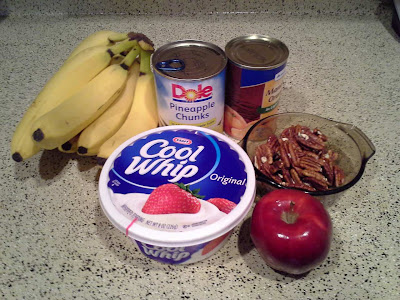
1 can of lightly sweetened tangerines (juices drained)
1 can of lightly sweetened pineapple chunks (juices drained)
2 bananas (peeled and cut into small chunks)
1 large peeled and diced apple (any variety)
1/2 cup chopped pecans (toast at 350 degrees for about 5-6 minutes to bring out the flavor)
1 small tub of Cool Whip (you can use the fat free if you are really counting calories)No fun though!


In a medium bowl combine your tangerines and pineapple.  Put your apples and bananas in a separate dish and toss with a small amount of lemon (as this keeps them from browning). Combine the apple and bananas with your pineapple mixture.  Add the cooled pecans and Cool Whip.  Gently fold all ingredients together so you do not damage fruit and to evenly coat your mixture.

 Voila!


You can add any variation of fruit or nut that you prefer.  For instance some like to add walnuts instead of pecans.  You can add grapes or any other fruit your family enjoys.  Sometimes I add a small handful of coconut, but, have found that some people really enjoy it and some people really don't.

I hope your family will enjoy this as much as my family does.  I made this at Beth's house at Thanksgiving and everyone loved it.  It's simple, fast and healthy! One of the few healthy Thanksgiving dishes I know how to make so far.  :)

Beth and I hope that you will take every opportunity to spend time in the kitchen and at your tables with your families.  This past Thanksgiving and Christmas she and I were like a well oiled machine.  We laughed and cooked together without getting in each others' way. Not always the way it works with two women in the same kitchen...you know what I mean! Right? :) We had so much fun together!  We hope you will do the same.  Here's hoping each of you have a wonderful day and a very healthy and prosperous New Year!

Always in Our PJs,
Annette & Beth

Sunday, January 6, 2013

Make Ahead Tips For Healthy Eating

Who's ready to go back to school after a 2 week break???
NO ONE!!!!

Don't get me wrong, I missed by co-workers and my students, but who wants to go back to work after two weeks of actually getting to go the restroom anytime you want??

Like it or not, here we go...and it is a new year, so many of us will go back with resolutions and goals for a healthier year.  I know me -- I will get so into work that my healthy eating will be the first goal to go unless I plan ahead.

So I made a few things that will help my family and me stay on the right track during the coming week.  You will rarely, if ever again, see Annette or I blogging on a Sunday.  We consider Sunday the Lord's Day, to be spent with Him, with our families, and resting.  We will most likely also be preparing for the coming week for our families.   We encourage you to do the same, in order to maintain the proper focus and balance we need in life.

First up...SMOOTHIE PACKETS!

Of course you can add any freezer items you want for your smoothies, but I added the following:

1 cup frozen strawberries (these happen to be slices, but they can be whole)
1/2 cup frozen blueberries
1/2 banana

Now all I have to do is grab a packet, some milk, maybe some spinach, add some ice, and blend it all up -- I won't have to  pull out any measuring cups (portion control matters), all the bags, knives, or whatever.   Healthy smoothies for us!!! :)


Another combo I put together is a cereal mix.  I can use it for breakfast, but I will most likely use it for snacking -- gotta have that fiber!!!

Again, pick any healthy ingredients - cereals, nuts, dried fruits
You can make it different every time or pick a favorite mix to keep on-hand.
This time I picked the following 3 items:

Shredded Wheat (TONS of fiber), Multi-grain Cheerios (love em!), and Pistachio Lovers Nut Mix (a new FAVE of mine):


No biggie here - just put in however much of each and mix it all up.  You can make one bowl to dip from (Be sure to watch your portion control and dip out only 1 cup or so each time!) or you can bag it in individual bags to grab on the go.  I will most likely do both - lol


YUM ~ Fiber AND Protein!


Here are a few things I got ready or pre-bag, so I can quickly grab them and plop them in my cute lunch kit.  Again, think of what you and your family likes, and make it as easy on yourself as possible.  I chose carrots and grapes, because everyone likes those.  I even sent a few bags with my college daughter.  I also keep cheese sticks on-hand.  We found these individual hummus packets that my husband and I enjoy with our carrots for a healthy snack.  We also love the grape tomatoes, which are easy to bag as well (forgot before I took pics).

Bob Harper says to "eat berries and apples every day" as one of his "Skinny Rules," so we always have those as well. (Remember the berries in my smoothie packets?)


Nice variety!  Tomorrow might look like a sandwich plus this (Morning snack, After school snack, and lunch side):


There are many combinations, but having easy options to choose from means even if you're in a hurry, you can eat healthy!

What about dinner?  I have gotten in the habit of buying meat in bulk and making double batches of most things when I cook - eat some, freeze some.  Casseroles, chilis, and soups are all good to do this with.  I also buy large quantities of chicken breasts, divide them into bags, add whatever marinade I have on-hand, and freeze.  I can pull them out in the morning and they're ready to cook when we get home.  (I say we, because the guys often grill the chicken or put it in a roasting pan and bake it. SO EASY!)

This was a packet of 8 chicken breasts.  We decided to marinate it all in Teriyaki Sauce, because we wanted to use it up and everyone likes it best. HaHa

This:

Now looks like this:


Those two red quart-sized bags are individual pieces that went with our daughter to college.  There is a "family" meal with 4 chicken breasts, and then a "pair" for when it is just the hubby and I. :)
Tip:  Be sure to date everything, so it can be rotated and nothing gets left in the fridge forever and ever (Annette and I have caught a few people who really like to keep those freezers loaded! YIKES!)

As time goes by,we can add more "make ahead" ideas if you all like these. Leave us some comments, because we love those, and let us know if you have any ideas or questions for us.

Remember - Plan Ahead and Eat Healthy (most of the time ;)

Always in Our PJs,
Annette & Beth

Friday, January 4, 2013

Chicken Tortilla Soup ~ A Cold Evening Treat

I am one of those people who loves soup on a cold night.  It's comfort food, literally.

When my friend, Rebecca, posted on Facebook about an EASY Crock-pot Chicken Tortilla Soup recipe, I thought, "I was just wanting to try to make chicken tortilla soup!  What a coincidence!" So I quickly asked for her recipe and set off to the store...

Funny story... Uh, I accidentally bought HOT enchilada sauce -- Of course I figured that out AFTER I dumped it into my crock pot with the other ingredients.  YIKES!  My family does not do well with "too hot." (I do, but they don't.)  So, there began my experiment with extra mix-ins to make it not as hot.  It turned out great, if a tiny bit too hot.  To our surprise, our son really loved it.

Since yesterday was cold and dreary outside - a perfect day for some comfort food - I decided I would try it again, minus the "too hot" part.  Well, I couldn't find the recipe, so I messaged Rebecca again.  She gave me the "gist," but it was not the whole recipe.  I also tried Pinterest (of course) and none of the recipes I came across seemed quite right.

Long story short (not really short, but short for me - lol) I took what Rebecca gave me, what I remembered, and a recipe from allrecipes.com, put them together and came up with this tasty and very easy crock-pot sensation!

You'll need about 1 pound(ish) of chopped or shredded cooked chicken.  I cheated and used the breasts from one of these amazing guys:


You will need a bunch of cans of stuff, like these:


Take my lead and use amounts to your/your family's taste!  That's the fun part!

1 can Enchilada Sauce (you choose - mild, medium, or hot - lol)
1 can Ro-Tel (a staple in Texas that also comes in mild, original, and hot)
1 can Chicken Broth
1 can Diced Tomatoes
1-2 can(s) of Whole Kernal Corn, drained and rinsed
1-2 can(s) of Black Beans, drained

You'll also need:

1 medium onion, chopped
2 garlic pods, minced
1 cup water
1 teaspoon cumin
1 teaspoon chili powder
salt, pepper, and any additional seasonings you enjoy to taste
*ground red pepper and/or Tabasco will add heat if desired

Dump all of this into your crock-pot and let it simmer for 4-6 hours.

Tip to those new to crock-pot use:  Don't be tempted to lift the lid.  Each time you lift the lid, heat escapes, and because crock-pots are "slow cookers," it takes a while for them to return to the proper temperature for proper cooking. :)

So tempting...

FINALLY READY!!!


Garnish with tortilla strips or chips, shredded cheese, sour cream, guacamole, etc.

I chose to serve it with Mexican corn muffins this time, but we added a few corn chips as well.


BONUS - LEFTOVERS to freeze or refrigerate:
(Remember to cool before placing in refrigerator or freezer.)


Our college senior dropped by and snuggled up with a bowl.
It apparently smelled quite tasty!
My sissy, Annette, would definitely say, "Sweeeet Maddie."


Lesson for today -- Don't be afraid to make a recipe "your own."
Annette and I want you to have fun while you cook - like we do!

Always in Our PJs,
Beth & Annette
Thursday, January 3, 2013

"A HOLE IN ONE"!

Hi Everyone!

Let's start this day with a simple, endearing recipe that holds so many special memories ~ "A Hole in One" ~ AKA Bulls-eye, AKA Eggs in a Basket, and I'm sure a few more I can't remember or don't know.

When Beth and I were growing up our Daddy cooked quite often.  I have never been a big breakfast eater, (especially eggs) but have always loved these.  I can see my Daddy's face now with the occasional..."How would you like a Hole in One?  I always jumped to attention!  Beth and my older sister, Karen always loved them.  My little girl Bailey also LOVES them (not typically a big eater) so much she might eat 2 or 3.  Beth always did her cute squeal when Daddy offered up the occasional breakfast treat.  Like I told you before her squeals were quite often endearing, but, sometimes not so much. LOL.

So let's get started.

All you need is:

1 egg
1 piece of bread

You will need to get your non-stick skillet heated to medium.  If you don't have a non-stick pan be sure to spray your skillet generously with Pam.

Cut a round circle out of the middle (you will want to save the circle as that's a little treat) ;).  I use a small biscuit cutter.  Place your piece of bread in the center of the pan with the circle of bread you cut out placed off to the side.  Put your cracked egg in the middle.  I always season the egg with a little salt and a small amount of pepper. Let it cook for a few minutes until you can see the egg is adhering to the bread.  You need to gently flip your egg and the small circle you have off to the side (it should be slightly browned).  Watch your egg closely and take your spatula and check it off and on until you feel the egg in soft in the middle, but, the white is slightly hardened.


Take the small circle you have reserved (that has been browning with the egg process) and put a little butter or jelly on it.  Always a special treat.

Voila!


I know this sounds so simple and it is, but, we have found that so many people have never had one.  We hope you enjoy this family favorite as much as we have over the years.  Always something endearing about the "Hole in One"!

Cooking little things like this have proven to have the fondest of memories for the people in my life.

Beth and I hope you will make many fond food memories with your families.  Food...paired with family and friends always binds people together. We hope you take opportunities to share time in the kitchen and at your table with the people you love! Hoping you all have a wonderful day!

Always in Our PJs,
Annette & Beth